How to sister a floor joist. The method of sistering a floor joist is one of the fantastic and most helpful ways to sort out the floor’s issues, such as instability, shaking or wobbling, and sagging.
The issue might occur if you have recently purchased an old house, or it might be your own house that starts creating floor issues with time. It’s the quickest and cheapest way to add stability and firmness to the subfloor.
The way only consists of installing or patching a joist with the older and weary joist of the floor. The new joist must require the same height, width, and length as the older joist.
Well, in the following article, you may quickly learn how to sister a floor joist so that you can repair your trouble-making floor without a professional.
Why is The Method Called Sistering?
Well, we don’t know what it means. Still, we think sistering indicates a sister’s relationship, like always together, helping each other, and providing support in difficult times.
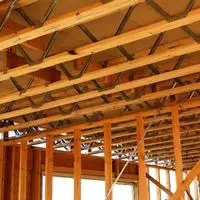
Therefore, the joists in a floor structure play a crucial role in supporting the beams. Have you ever imagined a subfloor without joists? Of course, not. It’s unusual and makes the floor sag with burden even in a short period.
Joists not only stand for the floor but play a vital character in bearing the burden of heavy household items, including walls and ceilings, as well as the movements of living over the floor.
Instructions How to sister a floor joist

Sistering is the best way to repair a collapsed floor. You may use the exact measurement of dimensional lumber to install it with the older one by using the bolts and nails, and the sistering is done.
Reasons For a Worn-Out Joist
Here are the following reasons that may develop the issue of a weary joist and may put you in another task of sistering. You may prevent these reasons to save other joists from getting damaged.
Dampness
Moisture due to water flooding and humid weather stays in the crawl spaces. It may lead to the issue of fungus and make the joist feeble.
Leakage Issues
If there is an issue of water leakage from the water supply lines, it may also affect and worsen the joists. Consequently, it may trigger wobbling or sagging issues.
Termitoidae
The third and last thing that becomes the culprit of a damaged joist is termite. The existence of these pest species can easily enable your floor to become a collapse.
Steps To Sistering Your Floor Joist
If you suspect the following signs in your home, then it’s essential to fix the issue through sistering. Signs of a damaged joist are given below.
- Dragged Doors
- Slits in Walls
- Cracks in Ceiling
- Slits In Foundation
- Tilt Beams
The steps to sistering the floor joist are described below:
Step 1. Unfasten the Wirings
So, at the very beginning, you need to unfasten the things you have attached. It’s a bit of time taking procedure. So, look for the cables, HVAC, and other barriers to sistering the floor joist.
It also means that you need to consider detaching the cables attached to the circuit breaker. If there are water lines, you may need to remove them from the valves.
Detaching all the characters (things) from the joist usually requires when usually you certify the sistering a joist with the exact measurement. That is why some people choose to sistering a sectional joist.
TIP:
Even if it’s difficult to detach all the attaching, you must remember that an entire joist provides more firmness to the floor.
Step 2. Level The Floor
So, as you know that the sistering of the flooring joists is usually triggered by the baggy or collapsed floor; it would be better to level the floor first.
To accomplish the leveling task, you need to lift the floor using the screw jack, as it gives a metal holding and enables you to lift or drop by revolving the threaded steel pipe.
The quantity of the jacks depends on the collapsed joists. Picking up the joist to 4 feet indicates how many jacks it ought to have.
Moreover, elevating a floor is a bit challenging and may cause some specific harm to wall paint, dry paint, or trim. If the sagging is not severe, it doesn’t require much lifting, even if it lessens the harm.
Step 3. Measure the Joist
If you want to sister the entire joist, it will be simple for measurement purposes. It would help if you had the idea of the older lumber dimension; get the new lumber exactly with the older one.
In contrast, if you have decided on partial joist sistering, it would be better to go with the rule of 2 by 3. If the older joist is 6, the new joist must be 4. Another example is if the older is 12, the new joist of 8 will be enough.
You can use the small pieces to support the joist. You may also consider sistering the floor joist from both sides to add more security and consistency.
Step 4. Adjust the Joist
It would help if you made certain the sistering joist is adequately adjusted with the old joist. You may find it challenging to adjust the full-sized joist over the bearing end as opposed to the damaged joist.
It might be possible that the damaged joist dwindles moderately and, consequently, minimizes the distance from the bearing wall to the subfloor or from the beam to the subfloor above.
Therefore, if it’s hard to adjust the joist because of narrowness, then to tackle the situation, you may think about picking up the old joist with the help of jack.
As we already explained, the jacking might come to light with some damage to the home characters. So you need to be attentive while doing the job.
Adjust the joist on the beam or wall with the joist you want sistering by placing the joist directly on the spot using the jack. Use the three bolts on both ends and the center by adjusting the level with the jack on both sides.
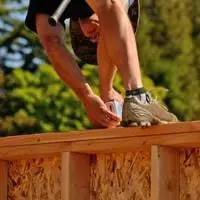
Step 5. Sister The Floor Joists
As you have placed the three bolts in the joist, ensure that all is happening right and adjusted correctly. Now, we recommend nails and bolts rather than screws.
It would be best to use 16d spiral nails, which are well compatible with both joists having a density of 1.5. It’s even enough to bulge out from the other side, curved into the wood from the other side.
Use the 6 nails at each spot, both ends, and center. On the other side of the sistering joist, insert 3 nails with the same sequence ends and center. It would be better to leave a few inches from the end while nailing. You may also use bolts instead 0f nails.
TIP:
Using adhesives in the empty spaces between the nails or bolts will not miss anything in the middle of the sistering joists.
Step 6. Reattach The Detached Thing
After cleaning all the steps, recheck the level and ensure that the floor is not creating the issue of splitting while moving on it. After making everything perfect, you can reattach things like wiring, HVAC, etc., that you detached before.
Conclusion
In the following article, you must be able to sister the floor joist and can fix the issue of sagging or collapsing. You may prevent the reasons that may trigger the issue of damaging joists. Be careful while proceeding with the steps, like jacking and adjusting the joist.
It would be best to have someone with you to help level, lift, or place the lumber. If you find the severe condition of the floor, it would be best to get help from a professional.
Related Guides