
How to install recessed lighting between floors. Recessed lighting is now almost in every home for lighting purposes. These lights are very commonly used in homes, and they install between the floors these are maybe small in size from the normal lights.
They are installed on the floor and do not appear separate from it like the other. Their process of installation is a bit difficult but if you follow the instructions you can do it.
It is difficult as this is a matter of electrician and the person know about it can easily and hurriedly do this.
How to install recessed lighting between floors
The process of the installation of these lights is simple for those people who have know-how about the electrical wiring and their cutting and installation etc. But is a bit difficult for a new person.
So here you require some tools which are necessary for the installation without these tools installation is not possible because you have to cut the ceiling and then wires and wiring all the new from starting and then they installed.
Some tools are used for the installation are:
- Wire cutters
- Screwdriver
- Keyhole
- Pencil
- Drilling machine
- Circuit tester
- Ladder
- Measuring Tape
Step 1
In this step, you have to gather all the components and then you have to start working. If all the tools and the components are not gathered then the work may be done slowly.
Gather all the above-given components and arrange them step by step where they are needed. If possible so you can also take one person with you who helps you to give you the tools.
Gathering all things can save your time and also eliminate the delays which occur while working when tools are not near to you.
Step 2
After the tools you have gathered then you can proceed to the next step and you should turn the power off. This is the work of the electricity and you have to off the power of the whole house because when the power is on then you do not work.
Electricity starts shorting when you cut the wires. Short electricity can harm you and the whole system of the home it can burn your house and there is no chance for you to stop it when it starts the first time.
So turn the breaker off which is holding your electricity. Here the tool tester has used this use the confirmation whether the electricity is off or not.
Step 3
Mark the places where you want to place these lights and you also make the map that represents where the lights are installed in the ceiling.
Make a blueprint that where you want to install the lights but make sure that the light is not on the place where joists of the ceilings and the beams are placed.
Locate the ceiling before placing it because planning is the solution to many problems and you can also save your time when you plan without planning too much time start wasting and you can not proceed to your work.
Step 4
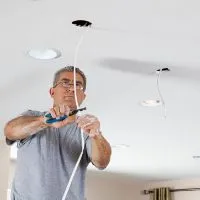
In this step, you have to cut the ceiling where you want to install the recessed lights, The cutting of the ceiling is very important because without cutting the installation of the lights is not possible.
So here you have the cutter which is used for the cutting and making the hole which is used for the placement of the lights. Drilling is also used for making holes in the ceiling and you should make this for the arrangement of the lights in the ceiling.
Now when you have cut the marks that you spot on the ceiling, here is the thing that you should wire. Without wiring, the recessed lights are not installed.
You have to wire and then install the lights, wiring directly relates to the junction box. Also, you have to open the junction box and switch these wires in that box.
When this process of wiring end then attach the lights and close the junction box and then turn the power on and turn the switch on from the breaker and you have to check that the lights are working or not. If working then your work is complete and your work is done.
How to Install Recessed Lighting
Related Guides