Exposed Beam Ceiling Insulation. Exposed beams ceiling as an open style ceiling. These can be made by removing the plater and the drywall already present on the old ceiling.
You can make an exposed beam ceiling and insulate it with techniques like windows. An exposed ceiling provides better insulation for us.
The insulation in my house was fine, but the insulation still wasn’t good enough. I decided to make the insulation better but had a lack of ideas.
Then friends recommended exposed ceiling for better comfort. I accepted and then I made my ceiling exposed and the insulation really got better.
Read to learn!.
Exposed Beam Ceiling Insulation
Insulation is a messy process, not that it makes a mess, but insulating the ceiling is hard. Without knowing insulation it’s hard to actually insulate the ceiling.
This requires professional insulation staff for most people, but insulating the ceiling is made easy here. Adding external cladding with the rafters will make insulation great. Adding an air barrier for insulation is neat.
The panels should be structurally lined. The isolation should be kept at a minimum. The roof deck should start with an insulation point. Keep the insulation cost of the ceiling in check. Protective gear while insulating is important.
The surface of the roof should be set first. Deciding on the quality and type of rafters to use in the ceiling is important. The method to make rafters deeper should be known. The thickness of insulation directly affects the room temperature too.
Getting yourself ready
Sart by getting the ladder and tools that are needed like mask, gloves, moisture meter, spray foam kit, etc. If you have gathered the tools, wear your gloves.
Ready the mask and wear it to avoid having air problems. Wear old clothes or clothes that are protective against harmful material. Put the special glasses on the eyes so the material won’t get in while setting or cutting.
Don’t work without gloves and a mask, the materials are highly hazardous. Make sure the gloves are anti-chemical and not winter gloves. Before insulation, ready the furnace pipes.
Clear unnecessary things and things that can get damaged from the room before starting. Now pace the ladder at the point you are starting.
Close the fumes and don’t let anyone enter the room because the chemicals can harm them. Not allowing others to enter will give you the ease of no one interfering with work.
Getting area ready

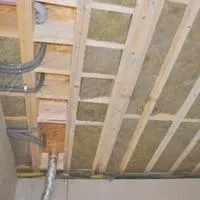
Once you are ready, ready for the ceiling surface. Now you need backing for installation. Install the backing and keep the joints of the baking as tight as possible.
There is foam between them and if the backing is loose, the foam will escape to the other surface and you won’t like it sticking and not getting off. Now set the water pipes and the wiring. Secure the ductwork as well. Make sure all components are secured.
The foam expands and when that happens, if the wiring and the components are not secured, they will come off. Now before spraying, check for humidity.
If there are humidity or water drops, wipe them dry. Use the moisture meter to check the reading of humidity. You won’t need it if it’s above 20, but just in case, wipe the area. Now foaming won’t be a problem.
Insulating
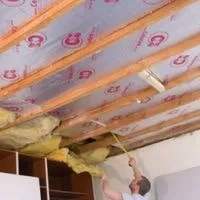
The spraying can be done now both the surface and the room are ready, so let’s begin. Observe the ceiling starting point. Get the spray from the market and shake it well before using the spray.
Now spray on the open areas of the ceiling with a thin layer for starting. The wall cavities will get filed and only an inch will expand.
Keep spaying and shaking the bottle every 10 seconds to avoid the spray getting clogged. You don’t want a clogged spray bottle, as clearing the foam from the nozzle is the hustle.
Now start applying the dry patch to the areas where the spraying is completed. It’ll take at least a day. Don’t let anyone get in there as the foam dries. If you have a better budget, get drywall for the ceiling. The fishing will get smoother with the drywall.
The last word
Having an exposed ceiling and wanting better insulation is a great idea. But putting effort into insulating is necessary. Insulating the ceiling has three steps: preparing yourself, preparing the surface, and then finally insulating and waiting.
If people have an allergy to the chemicals, then they shouldn’t do the ceiling by themselves. Getting professionals for insulating inst a bad idea.
Related Guides